ImageZoom 图片放大镜效果(多功能扩展篇)
主要扩展了原图和显示框的展示模式,有以下几种模式:
"follow" 跟随模式:显示框能跟随鼠标移动的效果;
"handle" 拖柄模式:原图上有一个拖柄来标记显示范围;
"cropper" 切割模式:原图用不透明的来标记显示范围,其他部分用半透明显示;
"handle-cropper" 拖柄切割模式:拖柄模式和切割模式的混合版,同时用透明度和拖柄来标记显示范围。
当然更多的扩展等待你的想象力来发掘。
兼容:ie6/7/8, firefox 3.6.2, opera 10.51, safari 4.0.4, chrome 4.1
程序说明
【扩展模式】
上次ImagesLazyLoad使用了继承做扩展,这次用插件的形式来做扩展。
先看看基础模式,这些模式是保存在ImageZoom._MODE中的,类似这样的结构:
ImageZoom._MODE = {
模式名: {
options: {
...
},
methods: {
init: function() {
...
},
...
}
},
...
}
其中模式名就是基础模式的名字,options是可选参数扩展,methods是程序结构的扩展。
基础模式包含"follow", "handle"和"cropper"模式,后面再详细介绍。
methods包含要扩展的钩子程序,是扩展的主要部分。
ps:这里说的模式不是“设计模式”里面的模式。
扩展需要在程序初始化时进行,要放在_initialize程序之前执行。
为了不影响原程序的结构,这里用织入法在_initialize之前插入一段程序:
ImageZoom.prototype._initialize = (function(){
var init = ImageZoom.prototype._initialize,
...;
return function(){
...
init.apply( this, arguments );
}
})();
原理就是先保存原来的函数,插入一段程序组成新函数,然后重新替换原来的函数。
考虑到组合基础模式的情况,使用了一个对象保存真正使用的模式:
mode = ImageZoom._MODE,
modes = {
"follow": [ mode.follow ],
"handle": [ mode.handle ],
"cropper": [ mode.cropper ],
"handle-cropper": [ mode.handle, mode.cropper ]
};
可以看到"handle-cropper"模式其实就是"handle"和"cropper"的组合模式。
插入的程序的主要任务是根据设定好的基础模式,进行扩展:
var options = arguments[2];
if ( options && options.mode && modes[ options.mode ] ) {
$$A.forEach( modes[ options.mode ], function( mode ){
$$.extend( options, mode.options, false );
$$A.forEach( mode.methods, function( method, name ){
$$CE.addEvent( this, name, method );
}, this );
}, this );
}
首先扩展options可选参数对象,由于可选参数是第三个参数,所以用arguments[2]获取。
extend的第三个参数设为false,说明不重写相同属性,即保留自定义的属性值。
然后把methods里面的方法作为钩子函数逐个添加到程序中。
methods可以包含init, load, start, repair, move, end, dispose这几个方法,分别对应ImageZoom中初始化、加载、开始、修正、移动、结束和销毁事件。
在扩展时,不同的事件执行不同的任务:
init初始化函数:用来设置扩展需要的属性,注意这些属性不要跟ImageZoom本身的属性冲突了,即重名。
load加载函数:图片加载完成,相关参数也设置完成,主要做执行放大效果前的准备工作。
start开始函数:触发放大效果时执行的。
repair修正函数:用于修正大图定位的坐标值。
move移动函数:触发放大效果后,鼠标移动时执行的。
end结束函数就:结束放大效果时执行的。
dispose销毁函数:在移除程序时清理程序的。
ps:具体位置参考ImageZoom中使用$$CE.fireEvent的部分。
可以看到这里用了织入法(weave)和钩子法(hook)对程序做扩展。
织入法是一种aop,可以在不改变原程序的基础上进行扩展,但只能在函数前面或后面加入程序。
而钩子法必须在原程序中设置好对应钩子才能配合使用,但位置相对灵活。
【跟随模式】
在"follow"跟随模式中,进行放大时,显示框会跟随鼠标移动,就像拿着放大镜看的效果。
首先显示框要绝对定位,要实现显示框跟随鼠标移动,只要在move中设置对应的left/top就行了:
var style = this._viewer.style;
style.left = e.pageX - this._repairFollowLeft + "px";
style.top = e.pageY - this._repairFollowTop + "px";
其中pageX/pageY是鼠标当前的坐标,_repairFollowLeft/_repairFollowTop是坐标的修正参数。
修正参数是在load中设置的,如果显示框隐藏的话,用上一篇获取显示范围的方法获取参数:
if ( !viewer.offsetWidth ) {
styles = { display: style.display, visibility: style.visibility };
$$D.setStyle( viewer, { display: "block", visibility: "hidden" });
}
...
if ( styles ) { $$D.setStyle( viewer, styles ); }
为了跟随时,让鼠标固定在显示框中心位置,先根据显示框的offsetWidth/offsetHeight修正参数:
this._repairFollowLeft = viewer.offsetWidth / 2;
this._repairFollowTop = viewer.offsetHeight / 2;
如果显示框的offsetParent不是body,还需要根据offsetParent修正坐标:
if ( !/BODY|HTML/.test( viewer.offsetParent.nodeName ) ) {
var parent = viewer.offsetParent, rect = $$D.rect( parent );
this._repairFollowLeft += rect.left + parent.clientLeft;
this._repairFollowTop += rect.top + parent.clientTop;
}
ps:在Maxthon测试时发现body子元素的offsetParent不是body而是html。
为了在移除程序后,能恢复显示框的样式,在load程序中做了样式的备份:
var viewer = this._viewer, style = viewer.style, styles;
this._stylesFollow = {
left: style.left, top: style.top, position: style.position
};
并在dispose中恢复:
$$D.setStyle( this._viewer, this._stylesFollow );
现在已经达到了基本的效果,但由于大图移动范围的限制,当鼠标移动到接近边界时,大图就卡住不会动了。
为了实现在鼠标移动时,大图会持续变化的效果,在repair中修正了移动坐标:
pos.left = ( viewerWidth / 2 - pos.left ) * ( viewerWidth / zoom.width - 1 );
pos.top = ( viewerHeight / 2 - pos.top ) * ( viewerHeight / zoom.height - 1 );
原理稍有些复杂,以水平坐标为例,先看下图:
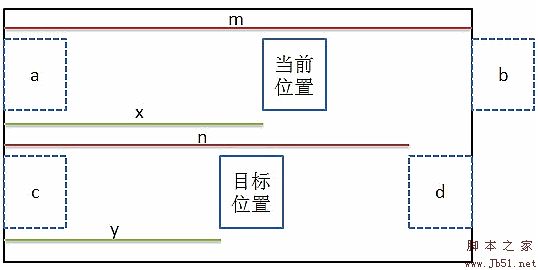
大方框代表大图对象,小方框代表显示框。
当前位置是根据鼠标坐标得到的实际显示的位置,目标位置想要实现效果的位置。
有一些物理或几何知识应该明白这个等式:x / y = m / n
可以推出:y = x * n / m = x * ( zoom.width - viewerWidth ) / zoom.height
x当前坐标可以通过pos.left来得到:x = viewerWidth / 2 - pos.left
最后得到:left = -y = ( viewerWidth / 2 - pos.left ) * ( viewerWidth / zoom.width - 1 )
垂直坐标也差不多。
【拖柄模式】
拖柄是一个层,在原图上面,用来表示显示范围在原图的位置和范围。
显示范围可以根据_rangeWidth/_rangeHeight获取。
至于位置的指定可以根据鼠标坐标或大图定位坐标来设置。
如果鼠标坐标的话还必须做其他处理,例如范围控制,而根据大图定位坐标相对就方便准确得多,程序也是用后面一个方法。
首先在init定义一个_handle拖柄对象:
var handle = $$( this.options.handle );
if ( !handle ) {
var body = document.body;
handle = body.insertBefore(this._viewer.cloneNode(false), body.childNodes[0]);
handle.id = "";
handle["_createbyhandle"] = true;
}
$$D.setStyle( handle, { padding: 0, margin: 0, display: "none" } );
如果没有自定义拖柄对象,会复制显示框作为拖柄对象。
对于自动生成的拖柄对象,会添加"_createbyhandle"属性作标记,方便在dispose中移除。
在load时,设置拖柄样式:
$$D.setStyle( handle, {
position: "absolute",
width: this._rangeWidth + "px",
height: this._rangeHeight + "px",
display: "block",
visibility: "hidden"
});
绝对定位是必须的,并根据_rangeWidth/_rangeHeight设置尺寸。
设置display和visibility是为了下面获取参数。
先根据原图坐标获取修正参数:
this._repairHandleLeft = rect.left + this._repairLeft - handle.clientLeft;
this._repairHandleTop = rect.top + this._repairTop - handle.clientTop;
和跟随模式类似,也要做offsetParent定位的修正:
if ( handle.offsetParent.nodeName.toUpperCase() != "BODY" ) {
var parent = handle.offsetParent, rect = $$D.rect( parent );
this._repairHandleLeft -= rect.left + parent.clientLeft;
this._repairHandleTop -= rect.top + parent.clientTop;
}
然后重新隐藏:
$$D.setStyle( handle, { display: "none", visibility: "visible" });
在start时,显示拖柄对象。
在move时,根据大图定位坐标设置拖柄定位:
var style = this._handle.style, scale = this._scale;
style.left = Math.ceil( this._repairHandleLeft - x / scale ) + "px";
style.top = Math.ceil( this._repairHandleTop - y / scale ) + "px";
在end时,隐藏拖柄对象。
【切割模式】
“切割”就是选择的部分全透明,其他部分半透明的效果。
主要通过clip来实现,具体原理可以看图片切割效果。
为了实现切割效果,需要在init中新建一个_cropper切割层:
var body = document.body,
cropper = body.insertBefore(document.createElement("img"), body.childNodes[0]);
cropper.style.display = "none";
并在load中设置这个切割层:
cropper.src = image.src;
cropper.width = image.width;
cropper.height = image.height;
$$D.setStyle( cropper, {
position: "absolute",
left: rect.left + this._repairLeft + "px",
top: rect.top + this._repairTop + "px"
});
差不多是复制一个原图对象,并且绝对定位到原图对象上面。
在start时,显示切割层,并根据透明度设置原图为半透明状态。
在move时,根据大图移动的坐标设置切割层要clip的范围:
var w = this._rangeWidth, h = this._rangeHeight, scale = this._scale;
x = Math.ceil( -x / scale ); y = Math.ceil( -y / scale );
this._cropper.style.clip = "rect(" + y + "px " + (x + w) + "px " + (y + h) + "px " + x + "px)";
在end时,隐藏切割层,并重新设置原图为不透明,来恢复原来的状态。
还要记得在dispose中移除切割层。
使用技巧
需要扩展的效果时才需要添加这个扩展程序。
可自行对ImageZoom._MODE进行扩展,扩展后记得在modes添加对应模式。
可以组合多个基础模式同时使用,具体参考"handle-cropper"模式。
使用说明
使用方法跟ImageZoom差不多,只是多了一个可选参考mode设置显示模式。
使用"handle"模式时,可选参数的"handle"属性可以设置拖柄对象。
使用"cropper"模式时,可选参数的"opacity"属性可以设置透明度。
使用"handle-cropper"模式时,以上两个参数都可以使用。
程序源码
ImageZoom._MODE = {
//跟随
"follow": {
methods: {
init: function() {
this._stylesFollow = null;//备份样式
this._repairFollowLeft = 0;//修正坐标left
this._repairFollowTop = 0;//修正坐标top
},
load: function() {
var viewer = this._viewer, style = viewer.style, styles;
this._stylesFollow = {
left: style.left, top: style.top, position: style.position
};
viewer.style.position = "absolute";
//获取修正参数
if ( !viewer.offsetWidth ) {//隐藏
styles = { display: style.display, visibility: style.visibility };
$$D.setStyle( viewer, { display: "block", visibility: "hidden" });
}
//修正中心位置
this._repairFollowLeft = viewer.offsetWidth / 2;
this._repairFollowTop = viewer.offsetHeight / 2;
//修正offsetParent位置
if ( !/BODY|HTML/.test( viewer.offsetParent.nodeName ) ) {
var parent = viewer.offsetParent, rect = $$D.rect( parent );
this._repairFollowLeft += rect.left + parent.clientLeft;
this._repairFollowTop += rect.top + parent.clientTop;
}
if ( styles ) { $$D.setStyle( viewer, styles ); }
},
repair: function(e, pos) {
var zoom = this._zoom,
viewerWidth = this._viewerWidth,
viewerHeight = this._viewerHeight;
pos.left = ( viewerWidth / 2 - pos.left ) * ( viewerWidth / zoom.width - 1 );
pos.top = ( viewerHeight / 2 - pos.top ) * ( viewerHeight / zoom.height - 1 );
},
move: function(e) {
var style = this._viewer.style;
style.left = e.pageX - this._repairFollowLeft + "px";
style.top = e.pageY - this._repairFollowTop + "px";
},
dispose: function() {
$$D.setStyle( this._viewer, this._stylesFollow );
}
}
},
//拖柄
"handle": {
options: {//默认值
handle: ""//拖柄对象
},
methods: {
init: function() {
var handle = $$( this.options.handle );
if ( !handle ) {//没有定义的话用复制显示框代替
var body = document.body;
handle = body.insertBefore(this._viewer.cloneNode(false), body.childNodes[0]);
handle.id = "";
handle["_createbyhandle"] = true;//生成标识用于移除
}
$$D.setStyle( handle, { padding: 0, margin: 0, display: "none" } );
this._handle = handle;
this._repairHandleLeft = 0;//修正坐标left
this._repairHandleTop = 0;//修正坐标top
},
load: function() {
var handle = this._handle, rect = this._rect;
$$D.setStyle( handle, {
position: "absolute",
width: this._rangeWidth + "px",
height: this._rangeHeight + "px",
display: "block",
visibility: "hidden"
});
//获取修正参数
this._repairHandleLeft = rect.left + this._repairLeft - handle.clientLeft;
this._repairHandleTop = rect.top + this._repairTop - handle.clientTop;
//修正offsetParent位置
if ( !/BODY|HTML/.test( handle.offsetParent.nodeName ) ) {
var parent = handle.offsetParent, rect = $$D.rect( parent );
this._repairHandleLeft -= rect.left + parent.clientLeft;
this._repairHandleTop -= rect.top + parent.clientTop;
}
//隐藏
$$D.setStyle( handle, { display: "none", visibility: "visible" });
},
start: function() {
this._handle.style.display = "block";
},
move: function(e, x, y) {
var style = this._handle.style, scale = this._scale;
style.left = Math.ceil( this._repairHandleLeft - x / scale ) + "px";
style.top = Math.ceil( this._repairHandleTop - y / scale ) + "px";
},
end: function() {
this._handle.style.display = "none";
},
dispose: function() {
if( "_createbyhandle" in this._handle ){ document.body.removeChild( this._handle ); }
this._handle = null;
}
}
},
//切割
"cropper": {
options: {//默认值
opacity: .5//透明度
},
methods: {
init: function() {
var body = document.body,
cropper = body.insertBefore(document.createElement("img"), body.childNodes[0]);
cropper.style.display = "none";
this._cropper = cropper;
this.opacity = this.options.opacity;
},
load: function() {
var cropper = this._cropper, image = this._image, rect = this._rect;
cropper.src = image.src;
cropper.width = image.width;
cropper.height = image.height;
$$D.setStyle( cropper, {
position: "absolute",
left: rect.left + this._repairLeft + "px",
top: rect.top + this._repairTop + "px"
});
},
start: function() {
this._cropper.style.display = "block";
$$D.setStyle( this._image, "opacity", this.opacity );
},
move: function(e, x, y) {
var w = this._rangeWidth, h = this._rangeHeight, scale = this._scale;
x = Math.ceil( -x / scale ); y = Math.ceil( -y / scale );
this._cropper.style.clip = "rect(" + y + "px " + (x + w) + "px " + (y + h) + "px " + x + "px)";
},
end: function() {
$$D.setStyle( this._image, "opacity", 1 );
this._cropper.style.display = "none";
},
dispose: function() {
document.body.removeChild( this._cropper );
this._cropper = null;
}
}
}
}
ImageZoom.prototype._initialize = (function(){
var init = ImageZoom.prototype._initialize,
mode = ImageZoom._MODE,
modes = {
"follow": [ mode.follow ],
"handle": [ mode.handle ],
"cropper": [ mode.cropper ],
"handle-cropper": [ mode.handle, mode.cropper ]
};
return function(){
var options = arguments[2];
if ( options && options.mode && modes[ options.mode ] ) {
$$A.forEach( modes[ options.mode ], function( mode ){
//扩展options
$$.extend( options, mode.options, false );
//扩展钩子
$$A.forEach( mode.methods, function( method, name ){
$$CE.addEvent( this, name, method );
}, this );
}, this );
}
init.apply( this, arguments );
}
})();
在线演示地址http://demo.glzy8.com/js/ImageZoom_ext/ImageZoom_ext.htm
打包下载地址http://www.glzy8.com/jiaoben/25809.html
出处:http://www.cnblogs.com/cloudgamer/