基于SVG的web页面图形绘制API介绍及编程演示
SVG是1999由W3C发布的2D图形描述语言,纯基于XML格式的标记语言,SVG的
全称是可扩展的矢量图形跟传统的Raster方式的图形(JPG, PNG, GIF等)有很大的差
别。SVG是2D图形开发平台,包括两个部分,一个是基于XML语言的数据描述,另
外一部分是可编程的API,其关键特性支持图形,文本,梯度填充,画笔风格,图形
特效滤镜如高斯模糊,会在稍后的代码中演示。同时还支持各种鼠标事件与DOM部
分API。几乎所有的主流浏览器都支持SVG图形格式的现实与绘制,IE9+以上也开始
支持SVG,在低版本的IE中需要插件支持。
更多了解SVG访问这里:http://www.w3.org/Graphics/SVG/About.html
二:JavaScript中SVG API编程演示
创建与获取SVG对象
// create svg object
var mySvg = document.createElementNS("http://www.w3.org/2000/svg","svg");
mySvg.setAttribute("version","1.2");// IE9+ support SVG 1.1 version
mySvg.setAttribute("baseProfile","tiny");
container.appendChild(mySvg);
在SVG中创建一个矩形图形:
var c1 = document.createElementNS("http://www.w3.org/2000/svg","rect");
c1.setAttribute("x","20");
c1.setAttribute("y","20");
c1.setAttribute("width","150");
c1.setAttribute("height","150");
c1.setAttribute("fill","rgb(0,0,255)");
c1.setAttribute("stroke","rgb(0,0,0)");
c1.setAttribute("stroke-width","4");
mySvg.appendChild(c1);
在SVG中实现文本绘制:
// SVG draw text
var stext = document.createElementNS("http://www.w3.org/2000/svg","text");
stext.setAttribute("x","700");
stext.setAttribute("y","100");
stext.setAttribute("font-size","18px");
stext.setAttribute("fill","#FF0000");
var textString = document.createTextNode("Hello SVG");
stext.appendChild(textString);
mySvg.appendChild(stext);
在SVG对象上实现鼠标点击事件处理与MouseUp事件处理:
// mouse event handling
c1.addEventListener("click",changeColor,false);
c2.addEventListener("mouseup", changeColor,false);
通过SVG 图形滤镜实现高斯模糊:
<div id="blur-image-demo">
<div id="left" style="width:20%;"><img src="woniu.png" alt="Original image" width="325" height="471"></div>
<div id="right" style="width:80%;">
<svg xmlns="http://www.w3.org/2000/svg" version="1.1">
<defs>
<filter id="f1" x="0" y="0">
<feGaussianBlur in="SourceGraphic" stdDeviation="5" />
</filter>
</defs>
<image x="0" y="0" width="325" height="471" xlink:href="woniu.png" filter="url(#f1)"/>
</svg>
</div>
</div>
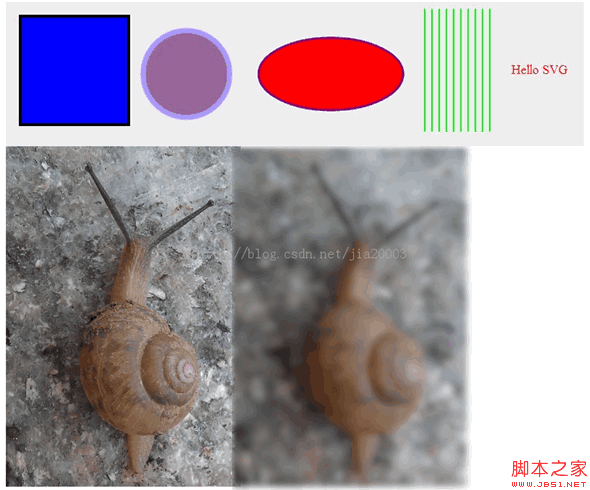
运行效果:
源代码,可以copy直接运行
JavaScript部分
window.onload = function() {
// get DIV
var container = document.getElementById("svgContainer");
// create svg object
var mySvg = document.createElementNS("http://www.w3.org/2000/svg", "svg");
mySvg.setAttribute("version", "1.2");// IE9+ support SVG 1.1 version
mySvg.setAttribute("baseProfile", "tiny");
container.appendChild(mySvg);
// create svg shape - rectangle
var c1 = document.createElementNS("http://www.w3.org/2000/svg", "rect");
c1.setAttribute("x", "20");
c1.setAttribute("y", "20");
c1.setAttribute("width", "150");
c1.setAttribute("height", "150");
c1.setAttribute("fill", "rgb(0,0,255)");
c1.setAttribute("stroke", "rgb(0,0,0)");
c1.setAttribute("stroke-width", "4");
mySvg.appendChild(c1);
// create svg shape - circle
var c2 = document.createElementNS("http://www.w3.org/2000/svg", "circle");
c2.setAttribute("cx", "250");
c2.setAttribute("cy", "100");
c2.setAttribute("r", "60");
c2.setAttribute("fill", "#996699");
c2.setAttribute("stroke", "#AA99FF");
c2.setAttribute("stroke-width", "7");
mySvg.appendChild(c2);
// create svg shape - ellipse
var c3 = document.createElementNS("http://www.w3.org/2000/svg", "ellipse");
c3.setAttribute("cx", "450");
c3.setAttribute("cy", "100");
c3.setAttribute("rx", "100");
c3.setAttribute("ry", "50");
c3.setAttribute("fill", "#FF0000");
c3.setAttribute("stroke", "purple");
c3.setAttribute("stroke-width", "3");
mySvg.appendChild(c3);
// create svg shape - draw lines
for(var i=0; i<10; i++)
{
var sline = document.createElementNS("http://www.w3.org/2000/svg", "line");
var x1 = 580 + i*10;
console.log(x1);
sline.setAttribute("x1", x1.toString());
sline.setAttribute("y1", "10");
sline.setAttribute("x2", x1.toString());
sline.setAttribute("y2", "180");
sline.setAttribute("stroke", "rgb(0,255,0)");
sline.setAttribute("stroke-width", "2");
mySvg.appendChild(sline);
}
// SVG draw text
var stext = document.createElementNS("http://www.w3.org/2000/svg", "text");
stext.setAttribute("x", "700");
stext.setAttribute("y", "100");
stext.setAttribute("font-size", "18px");
stext.setAttribute("fill", "#FF0000");
var textString = document.createTextNode("Hello SVG");
stext.appendChild(textString);
mySvg.appendChild(stext);
// mouse event handling
c1.addEventListener("click", changeColor, false);
c2.addEventListener("mouseup", changeColor, false);
};
function changeColor(evt) {
var target = evt.target;
target.setAttributeNS(null, "fill", "green");
}
HTML部分:
<html>
<head>
<title>Gloomyfish SVG Demo</title>
<style>
#svgContainer {
width:800px;
height:200px;
background-color:#EEEEEE;
}
#left { float: left;}
#right { float: right;}
</style>
</head>
<body>
<div id="svgContainer"></div>
<div id="blur-image-demo">
<div id="left" style="width:20%;"><img src="woniu.png" alt="Original image" width="325" height="471"></div>
<div id="right" style="width:80%;">
<svg xmlns="http://www.w3.org/2000/svg" version="1.1">
<defs>
<filter id="f1" x="0" y="0">
<feGaussianBlur in="SourceGraphic" stdDeviation="5" />
</filter>
</defs>
<image x="0" y="0" width="325" height="471" xlink:href="woniu.png" filter="url(#f1)"/>
</svg>
</div>
</div>
</body>
</html>