基于mootools的圆角边框扩展代码
JQuery下面有个扩展是用纯JS生成的圆角,不过和DIV+CSS拼出来是一样的道理,圆角看上去都比较粗糙。
用背景图片要好看得多,问题是不能拉伸,最简单做法就是用四个角小图片加边框拼出来。不过这样多出N多图片,一堆乱七八糟的代码,相当不爽。
有一个很有技巧的方法,用一张大图片+CSS来做,原理如下。
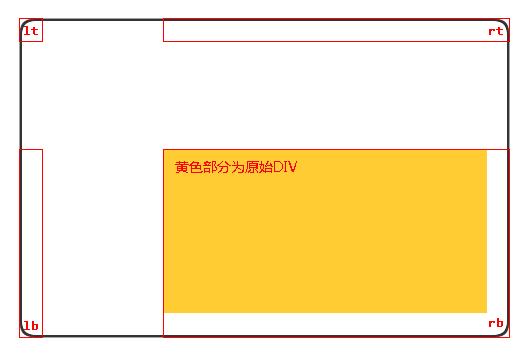
用一张大的背景图片做圆角,用CSS分别取四个角和边再拼成一个DIV。这样不仅可以解决圆角,还可以生成其它特殊的边框(比如阴影)。
但是每次使用都要加CSS也很不爽,于是用mootools写了一个Element类的扩展。
setBorder
Element.implement({
setBorder: function(pic, len) {
/// <summary>
/// 设定容器边框(图片).
/// 已测div
/// </summary>
/// <param name="pic">图片地址</param>
/// <param name="len">边框宽度</param>
/// <returns type="Element" />
var content = this.clone();
var width = this.getSize().x + len * 2;
var height = this.getSize().y + len * 2;
this.empty().setStyles({ 'width': width, 'height': height });
var lt = new Element('div', {
'styles': {
'width': len,
'height': len,
'float': 'left',
'background': 'url(' + pic + ') no-repeat left top'
}
});
var rt = new Element('div', {
'styles': {
'width': width - len,
'height': len,
'float': 'left',
'background': 'url(' + pic + ') no-repeat right top'
}
});
var lb = new Element('div', {
'styles': {
'width': len,
'height': height - len,
'float': 'left',
'background': 'url(' + pic + ') no-repeat left bottom'
}
});
var rb = new Element('div', {
'styles': {
'width': width - len,
'height': height - len,
'float': 'left',
'background': 'url(' + pic + ') no-repeat right bottom'
}
});
content.inject(rb, 'top');
lt.inject(this, 'top');
rt.injectBottom(this);
lb.injectBottom(this);
rb.injectBottom(this);
return this;
}
});
这样在页面上直接调用setBorder方法传个背景图片,边框宽度进去就行了。
HTML代码
<!DOCTYPE html PUBLIC "-//W3C//DTD XHTML 1.0 Transitional//EN" "http://www.w3.org/TR/xhtml1/DTD/xhtml1-transitional.dtd">
<html xmlns="http://www.w3.org/1999/xhtml" >
<head>
<title>Untitled Page</title>
<script type="text/javascript" src="mootools.js"></script>
<script type="text/javascript">
Element.implement({
setBorder: function(pic, len) {
/// <summary>
/// 设定容器边框(图片).
/// 已测div
/// </summary>
/// <param name="pic">图片地址</param>
/// <param name="len">边框宽度</param>
/// <returns type="Element" />
var content = this.clone();
var width = this.getSize().x + len * 2;
var height = this.getSize().y + len * 2;
this.empty().setStyles({ 'width': width, 'height': height });
var lt = new Element('div', {
'styles': {
'width': len,
'height': len,
'float': 'left',
'background': 'url(' + pic + ') no-repeat left top'
}
});
var rt = new Element('div', {
'styles': {
'width': width - len,
'height': len,
'float': 'left',
'background': 'url(' + pic + ') no-repeat right top'
}
});
var lb = new Element('div', {
'styles': {
'width': len,
'height': height - len,
'float': 'left',
'background': 'url(' + pic + ') no-repeat left bottom'
}
});
var rb = new Element('div', {
'styles': {
'width': width - len,
'height': height - len,
'float': 'left',
'background': 'url(' + pic + ') no-repeat right bottom'
}
});
content.inject(rb, 'top');
lt.inject(this, 'top');
rt.injectBottom(this);
lb.injectBottom(this);
rb.injectBottom(this);
return this;
}
});
window.addEvent('domready', function() {
$('demo').getElements('div').each(function(d) {
d.setBorder('border.png', 8);
});
});
</script>
</head>
<body>
<div id="demo">
<div style="width:150px; height:100px;">
<div style="width:100%; height:100%; background-color:Red;"></div>
</div>
<div style="width:80px; height:130px;">
<div style="width:100%; height:100%; background-color:Green;"></div>
</div>
</div>
</body>
</html>
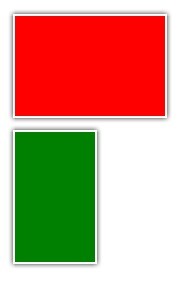
显显示效果
mootools边框demo http://demo.glzy8.com/js/mootools_yj/demo.htm
[Ctrl+A 全选 注:如需引入外部Js需刷新才能执行]
以前用Jquery也写过一个,居然找不着了,不过原理是一样的。