jquery实现鼠标滑过显示提示框的方法
本文实例讲述了jquery实现鼠标滑过显示提示框的方法。分享给大家供大家参考。具体如下:
一、jquery鼠标滑过显示提示框实例
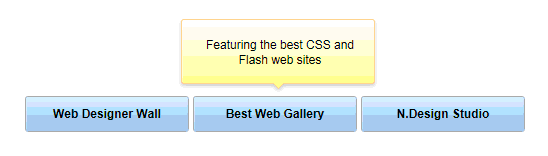
1、效果图
2、实现代码 ( 需要自行添加 jquery.js、按钮图片、提示框图片 )
HTML 代码
<html>
<head>
<meta http-equiv="Content-Type" content="text/html; charset=UTF-8" />
<title>Animated Menu Hover 1</title>
<script type="text/javascript" src="jquery。js"></script>
<script type="text/javascript">
$(document).ready(function(){
$(".menu li").hover(function() {
$(this).find("em").animate({opacity: "show", top: "-75"}, "slow");
}, function() {
$(this).find("em").animate({opacity: "hide", top: "-85"}, "fast");
});
});
</script>
<style type="text/css">
body {
margin: 10px auto;
width: 570px;
font: 75%/120% Arial, Helvetica, sans-serif;
}
.menu {
margin: 100px 0 0;
padding: 0;
list-style: none;
}
.menu li {
padding: 0;
margin: 0 2px;
float: left;
position: relative;
text-align: center;
}
.menu a {
padding: 14px 10px;
display: block;
color: #000000;
width: 144px;
text-decoration: none;
font-weight: bold;
background: url('背景图片1') no-repeat center center;
}
.menu li em {
background: url('背景图片2') no-repeat;
width: 180px;
height: 45px;
position: absolute;
top: -85px;
left: -15px;
text-align: center;
padding: 20px 12px 10px;
font-style: normal;
z-index: 2;
display: none;
}
</style>
</head>
<body>
<ul class="menu">
<li>
<a href="http://www.glzy8.com">Web Designer Wall</a>
<em>A wall of design ideas, web trends, and tutorials</em>
</li>
<li>
<a href="http://www.glzy8.com">Best Web Gallery</a>
<em>Featuring the best CSS and Flash web sites</em>
</li>
<li>
<a href="http://www.glzy8.com">N.Design Studio</a>
<em>Blog and design portfolio of WDW designer, Nick La</em>
</li>
</ul>
</body>
</html>
二、jquery鼠标滑过显示提示框实例二
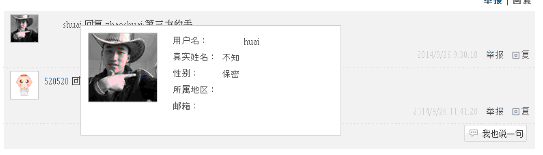
鼠标划过用户名时,在鼠标右下角显示div展示用户资料这个效果
1、效果图
2、实现方式
无非就三大块,一个是div的定位,这个是该效果的主要难点;二个是通过ajax异步加载数据;第三个就是要用到两个js属性onmouseover和onmouseout,即鼠标经过和鼠标离开。
3、实现步骤
(1)、首先设计好要显示用户资料的div的样式, 这里要注意的该方法不是给每个用户名的旁边都绑定一个div,当鼠标经过时显示,鼠标离开时隐藏,网页里就一个显示信息的div,哪里需要显示时就定位在哪里,这要就需要把该div的定位方式设置为绝对定位。
HTML代码:
<div class="pic">
<img src="../../Users/images/899。png" id="imguserhead" />
</div>
<div class="box">
<table width="220" border="0" style="overflow: hidden; text-overflow: ellipsis; white-space: nowrap">
<tr>
<td style="width: 70px;">用户名:</td>
<td>
<label id="lblusername"></label>
</td>
</tr>
<tr>
<td>真实姓名:</td>
<td>
<label id="lblrealname"></label>
</td>
</tr>
<tr>
<td>性别:</td>
<td>
<label id="sex"></label>
</td>
</tr>
<tr>
<td>所属地区:</td>
<td>
<label id="lbladdress"></label>
</td>
</tr>
<tr>
<td>邮箱:</td>
<td>
<label id="lblemall"></label>
</td>
</tr>
</table>
<div style="text-align: left; color: green; line-height: 40px; height: 30px; display: none;" id="messagediv ">正在加载中...</div>
</div>
</div>
(2)、相应css代码
width:380px;
height:160px;
float:left;
display:none;
border: 1px solid #ccc; position: absolute; z-index: 1; opacity: 0.1; background: white
}
.pic{
width:100px;
height:100px;
border:1px solid #ccc;
border-radius:10px;
float:left; margin:10px;
overflow:hidden;
}
.box{
width:240px;
height:140px;
margin:10px 0 10px 10px;
float:left;
overflow:hidden;text-overflow:ellipsis; white-space:nowrap;}
(3)、定位,为了能够精确的定位并且能够方便的调用,所以先在页面中放了两个标签,分别用于保存当前鼠标的坐标
<input type="hidden" id="pagey" />
然后用js获取当前坐标并保存到标签中:
$(document).mousemove(function (e) {
document.getElementById("pagex").value = e.pageX;//pageX() 属性是鼠标指针的位置,相对于文档的左边缘。
document.getElementById("pagey").value = e.pageY;//pageY() 属性是鼠标指针的位置,相对于文档的上边缘。
});
});
(4)、鼠标经过和离开事件js代码
$("#blockdiv").css({
"display": "block",
"left": document.getElementById('pagex').value,
"top": document.getElementById('pagey').value,
});
$("#messagediv").css("display", "block");
$.getJSON("../ashx/GetUserInfo。ashx?name=" + username,
function (data) {
if (data != null) {
$("#lblusername").html(data[0].User_Count)
$("#lblrealname").html(data[0].User_name);
$("#sex").html(data[0].User_Sex);
$("#lbladdress").html(data[0].User_Address)
$("#lblemall").html(data[0].User_Email);
if (data[0].User_HeadImg != null&&data[0].User_HeadImg != "") {
$("#imguserhead").attr("src", "../../Users/" + data[0].User_HeadImg.toString().substring(3));
}
else {
$("#imguserhead").attr("src", "../../Users/images/900.png");
}
$("#messagediv").css("display", "none");
}
else
$("#messagediv").html("未加载到数据!");
});
}
function HiddenInfo() {
$("#blockdiv").css({
"display": "none",
});
$("#lblusername").html("")
$("#lblrealname").html("");
$("#sex").html("");
$("#lbladdress").html("")
$("#lblemall").html("");
}
(5)、调用
jquery鼠标滑过显示提示框
</a>
希望本文所述对大家的jQuery程序设计有所帮助。