Extjs学习笔记之六 面版
Extjs为我们封装好了Panel,Panel具有统一的标题头,面板体,面板底部,还可以自由的添加工具栏等。另外,extjs中还有丰富的布局,可以用来布局Panel。这种方式很像Java的Swing. Panel可以嵌套,可以作为整个页面的框架,也可以作为一个小功能区。前几篇文中用到的FormPanel就是继承自Panel类的。
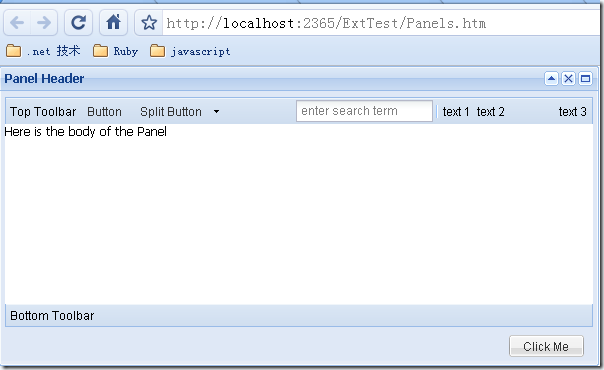
下面的例子展示了一个较为完整的Panel,主要是设置工具栏:
<html xmlns="http://www.w3.org/1999/xhtml">
<head>
<title>Extjs Combobox</title>
<link rel="Stylesheet" type="text/css" href="ext-3.1.0/resources/css/ext-all.css" />
<script type="text/javascript" src="ext-3.1.0/adapter/ext/ext-base.js"></script>
<script type="text/javascript" src="ext-3.1.0/ext-all.js"></script>
<script type="text/javascript" src="ext-3.1.0/src/locale/ext-lang-zh_CN.js"></script>
<script type="text/javascript">
Ext.onReady(function() {
new Ext.Panel({
title: 'Panel Header',
tbar: ['Top Toolbar', {
// xtype: 'button', // default for Toolbars, same as 'tbbutton'
text: 'Button'
},
{
xtype: 'splitbutton', // same as 'tbsplitbutton'
text: 'Split Button'
}, // begin using the right-justified button container
'->', // same as {xtype: 'tbfill'}, // Ext.Toolbar.Fill
{
xtype: 'textfield',
name: 'field1',
emptyText: 'enter search term'
},
// add a vertical separator bar between toolbar items
'-', // same as {xtype: 'tbseparator'} to create Ext.Toolbar.Separator
'text 1', // same as {xtype: 'tbtext', text: 'text1'} to create Ext.Toolbar.TextItem
{xtype: 'tbspacer' }, // same as ' ' to create Ext.Toolbar.Spacer
'text 2',
{ xtype: 'tbspacer', width: 50 }, // add a 50px space
'text 3'],
bbar: ['Bottom Toolbar'],
applyTo: 'mypanel',
frame: true,
html: '<div>Here is the body of the Panel</div>',
bodyStyle: 'background-color:#FFFFFF',
height: 300,
width: 600,
collapsible: true,
tools: [{ id: 'toggle' }, { id: 'close' }, { id: 'maximize'}],
buttons: [new Ext.Button({ text: 'Click Me' })]
});
});
</script>
</head>
<body>
<div id="mypanel"></div>
</body>
</html>
效果如下:
下面介绍如何给面板加载内容。其实上面的例子已经展示了一种方法,那就是通过html属性直接指定,不过这种方法似乎没有太大的实用价值。Panel具有一个autoLoad属性,可以加载远程页面。新建一个页面RemoteContent.htm,内容如下:
<html xmlns="http://www.w3.org/1999/xhtml">
<head>
<title></title>
</head>
<body>
<ul>
<li>List Item 1</li>
<li>List Item 2</li>
<li>List Item 3</li>
<li>List Item 4</li>
<li>List Item 5</li>
</ul>
</body>
</html>
将上例的html配置项去掉,换成:
autoLoad:'RemoteContent.htm'则效果为:
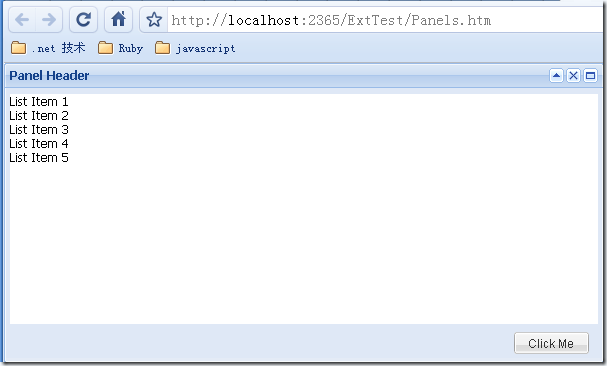
autoLoad配置项会把<body></body>之间的内容加载进来。要注意,加载的文件中不能含有<!-- -->,否则不能正常加载。另外要注意,用这种方法直接加载aspx页面往往不能成功。例如,新建一个Default.aspx页面,内容为:
<html xmlns="http://www.w3.org/1999/xhtml">
<head runat="server">
<title></title>
</head>
<body>
<form id="form1" runat="server">
<div>
<asp:Label ID="Label1" runat="server" Text="Label"></asp:Label>
<asp:Button ID="Button1" runat="server" Text="Button" onclick="Button1_Click" />
</div>
</form>
</body>
</html>
按钮事件为:
Label1.Text = "Hello Asp.net With Extjs.";
把autoLoad配置为Default.aspx页面,点击下按钮,就会发现整个Panel都没了,就剩下aspx页面上的内容。因此autoLoad适合加载htm文件,或者是通过ashx页面输出的html代码,这些输出的代码都由我们自己严格控制,而用默认的aspx的回发页面肯定是不行的。要直接将extjs和asp.net的服务器控件组合起来用也是不太可能的。如果非要偷个懒,可以用这样的方法:
html:' <iframe scrolling="auto" frameborder="0" width="100%" height="100%" src="'+'default.aspx'+'"> </iframe>'这样就可以了。
Panel还具有一个ContentEl属性,可以加载本页面上的dom节点。这种方法也能和asp.net服务器控件结合使用,对Default.aspx稍加修改:
<body>
<formid="form1"runat="server">
<divid="panelcontent">
<asp:LabelID="Label1"runat="server"Text="Label"></asp:Label>
<asp:ButtonID="Button1"runat="server"Text="Button"onclick="Button1_Click" />
</div>
<div>Here is some fixed Content</div>
<divid="panel"></div>
</form>
</body>
head部分的脚本和上面的例子一致,只是把html和autoLoad属性都去掉,换成:
contentEl: 'panelcontent'表示这个panel要加载id为panelcontent的div中的内容,也就是一个Label和一个button。效果如下:
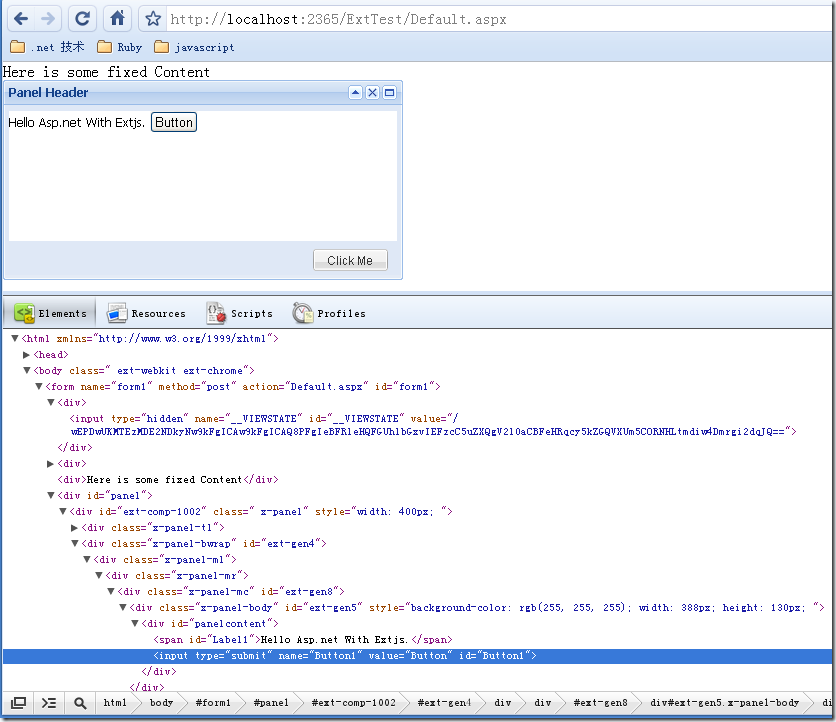
可以看到contentEl的效果,它是把原来在
<div>Here is some fixed Content</div>
之上的内容移动到Panel的内部 。这个时候点击button,能够正确响应服务器端的代码。这种方式仅仅是在页面上移动一些DOM节点的位置,一般来说对服务器端事件不会造成什么影响,但是这样Panel的作用和div也相差不大了。
最后介绍通过items配置项向Panel内添加其他Extjs组件的方法。Panel内除了直接添加html之外还可以添加其他的组件,Panel本身也是组件,所以Panel是可以嵌套的。嵌套的Panel结合下一节要介绍的布局可以方便的完成一些布局工作。
新建一个nestedPanel.htm,代码如下,通过items配置Panel内部的内容:
<html xmlns="http://www.w3.org/1999/xhtml">
<head>
<title>Extjs Nest Panel</title>
<link rel="Stylesheet" type="text/css" href="ext-3.1.0/resources/css/ext-all.css" />
<script type="text/javascript" src="ext-3.1.0/adapter/ext/ext-base.js"></script>
<script type="text/javascript" src="ext-3.1.0/ext-all.js"></script>
<script type="text/javascript" src="ext-3.1.0/src/locale/ext-lang-zh_CN.js"></script>
<script type="text/javascript">
Ext.onReady(function() {
new Ext.Panel({
title: 'Panel Header',
renderTo: 'panel1',
frame: true,
bodyStyle: 'background-color:#FFFFFF',
collapsible: true,
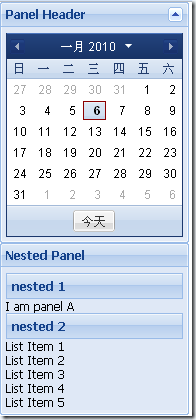
items: new Ext.DatePicker(),
width: 189
});
new Ext.Panel({
title: 'Nested Panel',
renderTo: 'panel2',
width: 189,
frame: true,
items: [{ xtype: 'panel', title: 'nested 1',html:'<div>I am panel A</div>' },
{ xtype: 'panel', title: 'nested 2', autoLoad:'RemoteContent.htm'}]
});
});
</script>
</head>
<body>
<div id="panel1"></div>
<div id="panel2"></div>
</body>
</html>
效果如下: